Semi-automatic laminator installation instructions
Installation sequence and steps
1. Check if the equipment has bumps and oil leaks after the unloading is completed.
2. The equipment is in place at one time ( 4~5T forklift is recommended ) , and the equipment is implemented at the foot.
3. Remove the equipment guard.
4. Check if the relevant electrical components are loose, and ensure that the electrical components are electrically shocked.
5. Install the touch screen bracket and connect the touch screen related cable.
6. Connect the total gas source and the gas source needs to be dried, Trachea diameter D12mm.
7. Adjust the air supply output pressure of the device to about 0.6mpa, and adjust the hand slide valve to be ventilated.
8. Correctly connect the main power supply and check the phase sequence of the power supply and the phase-to-phase voltage AC380V.
9. Jog the oil pump or vacuum pump button, check that the motor's rotation direction must be clockwise, otherwise you need to change the power phase sequence.
10. After manually opening the cover, adjust the equipment horizontally based on. the surface of the hot plate (rotating the foot to level).
11. Ensure that the strip and the sheet are not damaged.
12. Manually open and close the cover to ensure a smooth switch cover.
13. Power on for manual test.
14. Linkage test machine.
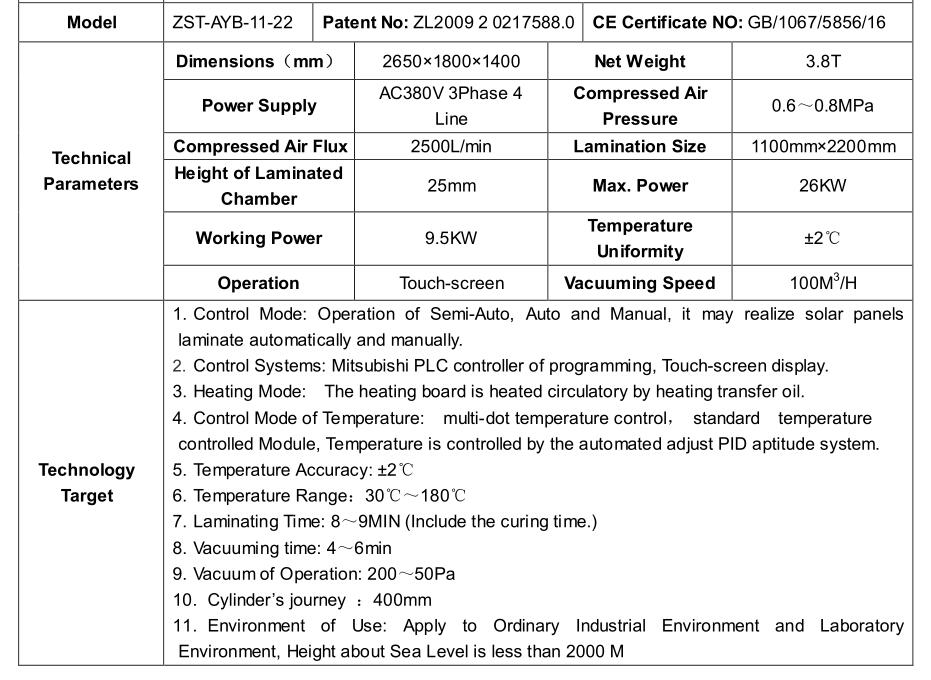
Installation parameters

Equipment maintenance instructions
Routine maintenance
1. Check and ensure that the vacuum pump oil level is within the specified range, the oil level is as high as possible, use the model oil recommended by the vacuum pump manufacturer ( vacuum pump special oil VM100 ) .
2. Check the dust accumulated on the heating plate and the silicone strip daily to clean the dirt in time. When it is cool, wipe it off with a cotton cloth.
3. At any time, observe whether the rubber strip in the laminating press of the laminating machine shows signs of falling off. If any signs of falling off are
found, it should be restored or replaced in time. Otherwise, it is easy to break the bead and cause air leakage.
4. Discharge the water stored in the oil-water separator at any time. If the vacuum pump oil is sucked into the oil-water separator, it should be cleaned and replaced in time.
5. Check the rubber plate for damage and replace it in time.
6. Check all vacuum connections and quick connectors for looseness and tightening in time.
7. In view of the frequent opening and easy wear of the vacuum tube butterflyvalve, it is recommended to inject vacuum pump oil once every 1000 cycles, 3-5ml each time to ensure normal working condition.
8. Check the heat transfer oil pressure value ( 0.15~0.25Mpa ) . If the pressure is too low, stop the machine to eliminate the fault.
9. Check the vacuum of the vacuum pump, if there is a slow pumping rate or a leak ( 100S vacuum reaches 100Pa ) .
10. Check the operation of the cylinder and lubricate it at the wearable parts such as the connecting shaft.
Weekly maintenance
1. Check if the vacuum solenoid valve, inflation valve, and exhaust valve are abnormal, and clean the valve core in time.
2. Vacuum pump oil should be replaced once for 300-500 hours
3. Check the operation of each pneumatic valve and switch
4. Check the use of the trachea and vacuum lines
5. Check the use of electrical components and fasten the connection of electrical components
Monthly maintenance
1. The vacuum pump should be thoroughly cleaned after 4 months of operation and cleaned with gasoline.
2. Check the use of the heating plate, fuel tank platinum resistance, and periodically calibrate
3. Replace the laminate after more than 2,500 times.
4. The vacuum pump needs to be replaced with an exhaust filter and an oil filter for 2000 hours.
5. Clean the intake filter of the vacuum line once a month.
 ZST-AYB-11-22-LAMINATOR-Manual.pdf


